Disclosure: As an Amazon Associate, I earn from qualifying purchases. This site uses localized tracking links.
Speaker Configuration: Hardware Link Modes & Sonos Network Topology
Once your home router’s wireless environment is fully optimized, the final step to rock solid system stability is configuring how your physical Sonos speakers anchor themselves to your network.
As a Cisco CCNP, the most common hardware mistake I see users make involves a total misunderstanding of how Sonos hardware routes data and handles system-wide communication.
1. The Core Strategy: Shifting to Wired Infrastructure Mode (SonosNet)
By default, out of the box, Sonos speakers run in Station Mode (Wi-Fi Setup). They compete with your family’s phones, laptops, and TVs for wireless airspace on your router.
For absolute audio stability, the golden rule of Sonos engineering is to physically connect at least one primary Sonos speaker into your router or core switch using an Ethernet cable.
What Happens When You Plug It In?
The moment a single compatible Sonos speaker detects a live physical network wire, it triggers an architectural shift across your entire house. The hardwired speaker turns off its reliance on your router’s Wi-Fi and establishes a dedicated, isolated peer-to-peer wireless mesh network called SonosNet.
- Your other wireless Sonos speakers immediately break away from your home router’s Wi-Fi.
- They chain together, using each other as wireless repeaters to pass audio data across the house.
- In your Sonos app under About My System, the speakers will shift their status code from WM:1 (Standard Wi-Fi) to WM:0 (Hardwired Mesh Mode).
What Typically Happens If You Don’t Wire a Speaker to your router/switch?
If you leave 100% of your Sonos system running purely over standard Wi-Fi (Station Mode), your system is highly susceptible to localized routing bugs:
- The Disappearing App Act: Because your phone has to track multiple stationary IP targets across changing wireless airspace, speakers will randomly drop out of the app completely.
- Stereo and Group Drift: When you group rooms together, your router has to individually stream identical, high-bandwidth packets to every single speaker simultaneously. This creates microsecond latency spikes, resulting in audio skipping or grouped rooms drifting out of sync.
- The Dreaded “No System Found”: Every time your router performs an automatic channel change or band-steers a device, the temporary disruption causes the Sonos system to lose its structural logic, forcing you to reboot your speakers constantly.
2. The Network Engineer’s Alert: Spanning Tree Protocol (STP) Loops
While hardwiring a speaker solves Wi-Fi congestion, hardwiring more than one speaker could introduce a serious enterprise networking risk: an STP Broadcast Storm.
Because SonosNet creates its own wireless links between speakers while a speaker is also plugged into a wire, it could create multiple active paths back to your router. Without proper path management, network packets will loop infinitely between the physical wire and the wireless airwaves. This will cause an invisible network storm that can completely freeze your TP-Link Deco mesh or crash your ASUS router admin panel.
3. The Home Theatre Exception: Primary vs. Satellite Hidden 5GHz Links
If you own a Sonos home theatre setup—consisting of a primary soundbar (such as an Arc, Beam, or Ray) paired with a Sonos Sub and Surround Speakers (like Sonos Ones)—the rules change slightly.
Many users plug an Ethernet cable into their soundbar, open the Sonos app settings, and toggle “Disable Wi-Fi” on the soundbar, assuming they are cleaning up wireless congestion. DON’T do this because it’ll instantly break your home theatre system!
How the Home Theatre Architecture Works:
- The Master: The soundbar acts as the primary master routing node for that specific room.
- The Hidden WiFi Link: To achieve perfectly synchronized, zero-latency theatre audio, the soundbar hosts its own hidden, private 5GHz ad-hoc wireless network broadcasting straight from its physical chassis.
- The Satellites: Your Sonos Sub and surround speakers act as slave satellites. They connect directly and exclusively to this hidden 5GHz master broadcast from your soundbar, bypassing your home router entirely.
Below is the what this home theatre topology typically looks like!
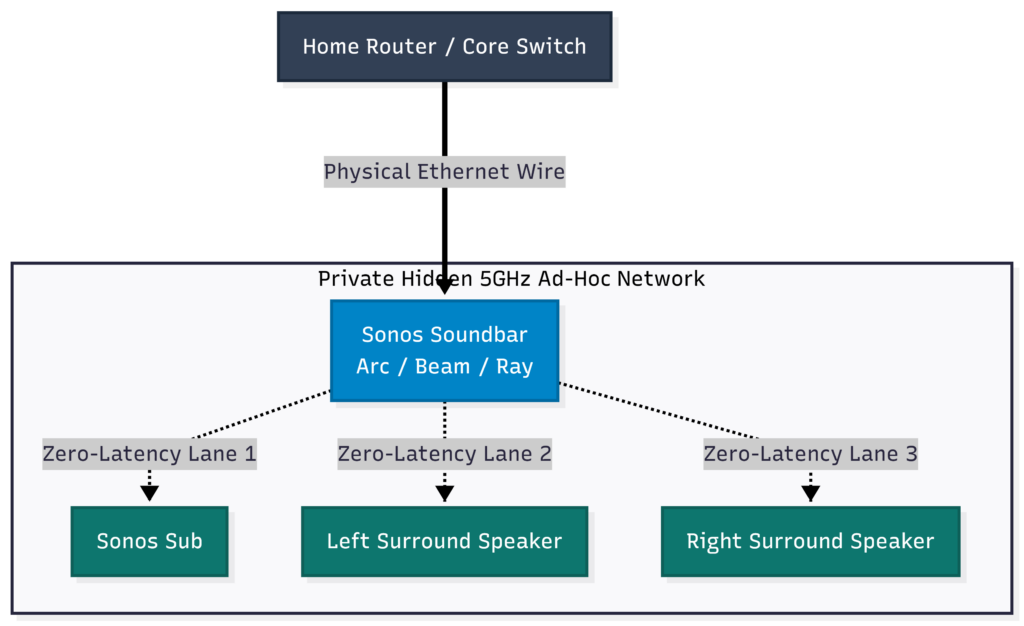
When you tap “Disable Wi-Fi” on your soundbar’s hardware profile, you’re physically cutting power to the internal wireless card hosting that private 5GHz link. The moment that radio card dies, your Sub and surrounds lose their master connection and go completely silent.
Never disable the “Wi-Fi” setting in the Sonos app for any Soundbar or Amp acting as a home theatre master component. Even when hardwired, its internal Wi-Fi card MUST remain Enabled so it can continuously talk to its surrounds and sub.
One thing to note: Even if your soundbar isn’t hard wired into your router/switch, the private 5GHz link will still form albeit in a much unstable state due to it having to wirelessly route the audio back to your home router.
(Important Nuance: Modern Wi-Fi 6/7 Era lines, including the Era 100, Era 300, Move 2, and Arc Ultra, do not support legacy SonosNet architecture. They’re built to operate natively on your optimized home Wi-Fi network).
4. Setting the SonosNet Channel (Avoiding Self Interference)
If you’ve followed the golden rule and hardwired at least one speaker to establish a SonosNet Mesh, you now have two separate wireless networks operating inside your home: your router’s Wi-Fi network and Sonos’s proprietary mesh network.
If your router and your Sonos system are trying to broadcast on the exact same 2.4 GHz frequency, they will constantly shout over each other, causing massive packet dropouts. Ideally, you must logically space these channels out!
Find the Hidden Setting:
The Sonos app hides this setting unless a hardwired backbone is active. To change it, follow the steps below.
- Open the Sonos App.
- Tap the Settings (Gear Icon) or the Account/Manage profile icon.
- Navigate to System > Network (or Manage > Network).
- Tap SonosNet Channel. (If this is greyed out, it means no speakers are currently detecting a hardwired ethernet connection).
- You’ll see three choices: 1, 6, or 11.
Never match your SonosNet channel with your router’s 2.4 GHz Wi-Fi channel. Because 1, 6, and 11 are the only three non-overlapping frequencies in the spectrum, you must coordinate them like this:
If your ASUS or TP-Link router’s 2.4 GHz Wi-Fi is fixed to Channel 1, set your SonosNet to Channel 6 or 11.
If your router is fixed to Channel 6, set your SonosNet to Channel 1 or 11.
If your router is fixed to Channel 11, set your SonosNet to Channel 1 or 6.
Verdict: By keeping your router and your Sonos speakers on entirely separate lanes, you eliminate co-channel interference and achieve flawless audio synchronization.
5. The Global “Disable SonosNet” Toggle (The Modern Network Option)
Sonos have rolled out a system-wide firmware update adding a dedicated “Disable SonosNet” toggle directly into the settings menu. Previously, if you plugged in a speaker to update a network password, the entire system would create a SonosNet mesh in the background by default. On modern, complex mesh systems (like high-end TP-Link Decos or ASUS AiMesh setups), legacy SonosNet can actively clash with the router’s modern backhaul algorithms, creating massive packet collisions.
If you want your modern speakers (like the Era series or Arc Ultra) to run 100% on your home Wi-Fi and stop them from building a background wireless mesh network, you can turn it off globally.
To find this setting, go to System Settings > Networks > Disable SonosNet. Note that this is a system-wide shift, completely distinct from disabling Wi-Fi on an individual speaker.
6. Speaker Troubleshooting
When a network has multiple smart speakers, they create a complex web of continuous data connections. If audio skips or the app freezes, guessing which device is causing the problem is nearly impossible. Stripping your system down to just one active speaker for 15 minutes strips away the guesswork and forces your network to reveal exactly where it is breaking down. From here you just need to keep adding another speaker and repeat the process until you start experiencing issues.
The Core Benefits:
- Establishes a Healthy Baseline: If one speaker plays flawlessly, you instantly prove your internet connection and streaming accounts are perfectly healthy.
- Exposes Your Wi-Fi Ceiling: Standard routers have strict wireless capacity limits. Adding speakers one by one lets you see the exact moment your Wi-Fi shifts from completely stable to completely overloaded. (Click Here to be taken to the Choosing a Router section!)
- Pinpoints the Exact Culprit: If your music plays beautifully on speakers 1 through 4, but instantly stutters when speaker 5 powers on, you’ve successfully isolated the exact conflict point.
7. Advanced Setups: Multiple Speakers
Hardwiring multiple speakers eliminates audio lag in large systems but creates a massive risk: Layer-2 network loops. The moment you plug an Ethernet cable into a speaker, it activates a private wireless mesh. If you leave your home Wi-Fi saved in the app, the speaker routes data over both the wire and the airwaves simultaneously. This causes an instant network storm that freezes your router. To run multiple wired speakers flawlessly without crashing your house, you must enforce three strict rules:
- Wipe Your Wi-Fi Credentials (Mandatory): The moment you connect your physical cables, delete your home wireless network from the app immediately to kill the loop path. Follow: Sonos App ➔ Settings ➔ System ➔ Network ➔ Networks ➔ Select Wi-Fi ➔ Tap “Remove”.
- LEAVE THESE WIRELESS: Never wire surround speakers (Era 300/100, Ones) or a Sub if their master soundbar in the group is already wired. The soundbar hosts its own private, zero-latency 5GHz link to talk to them natively. Wiring them will most likely jam this path!
Hardcode your Switch as the root bridge (CCNP Tip): The Boss!
Plugging multiple speakers into a standard “dumb” unmanaged switch chokes the system because the speakers will elect one of themselves as the network boss. You must use a Smart Managed Switch to dictate the hierarchy (see the Choosing a Network Switch page for recommendations). Log into your switch settings and manually set the STP priority to 4096.
The Move 2 & Roam Exception (Dedicated IOT SSID)
Portable lifestyle speakers cannot read SonosNet wireless mesh signals. If you remove your main Wi-Fi credentials to prevent loops, your Move 2 or Roam will lose connection entirely. To fix this, create a dedicated, isolated 2.4GHz IoT Smart Home Wi-Fi network (SSID) on your router. Add only this IoT Wi-Fi credential back into the app. Your portables will stream perfectly over this isolated frequency, while your hardwired setup remains completely immune to network storms (IOT networks often use channel 1 by default so ensure your Sonosnet is set to channel 11 for maximum separation).
The Verdict:
This simple elimination process stops you from wasting hours factory-resetting random gear or buying expensive replacements you don’t actually need. In under an hour, you get a definitive answer as to what’s happening. It’s genuinely saved me so much time so many times when troubleshooting network issues! I hope it does the same for you.
- If music stutters as you add wireless speakers: Your router has hit its wireless capacity ceiling. To expand safely, you must offload that traffic by hardwiring key speakers through a specialized Choosing a Network Switch setup.
- If your entire home internet instantly crashes: You’ve likely triggered a physical Spanning Tree network loop. To run multiple wired speakers safely, you must upgrade to a zero-configuration Smart Managed Switch (one with STP functionality enabled).
Still having problems with the Sonos app, speaker dropouts or stuttering audio? Click here to get additional support!